Wednesday, December 21, 2011

Appetizers Part 1: The Fillings

This will be a pretty long post and since I did half of this "project" (I won't call it recipe because technically, there are four different recipes in one here - but don't get scared!) today, and will finish tomorrow, I will post what I did today.

One of my favourite Christmas traditions is to make phyllo pastry appetizers. Finger foods are so popular during the holidays, and it's a lot more fun and cost-effective to make your own. I started doing this a couple of years ago and every year I get a little more creative with it. This year, I also bought some puff pastry so I'll let you know how that turns out.

This post will be dedicated to showing you what I did for my fillings. I stuck to four this year and as much as I'd like to do more, sometimes it just gets to be a little too much, especially when it comes to filling the pastry (which I won't lie, can be kind of tedious and time-consuming, but the end result is worth it, I promise).

So, let's get on with it then.

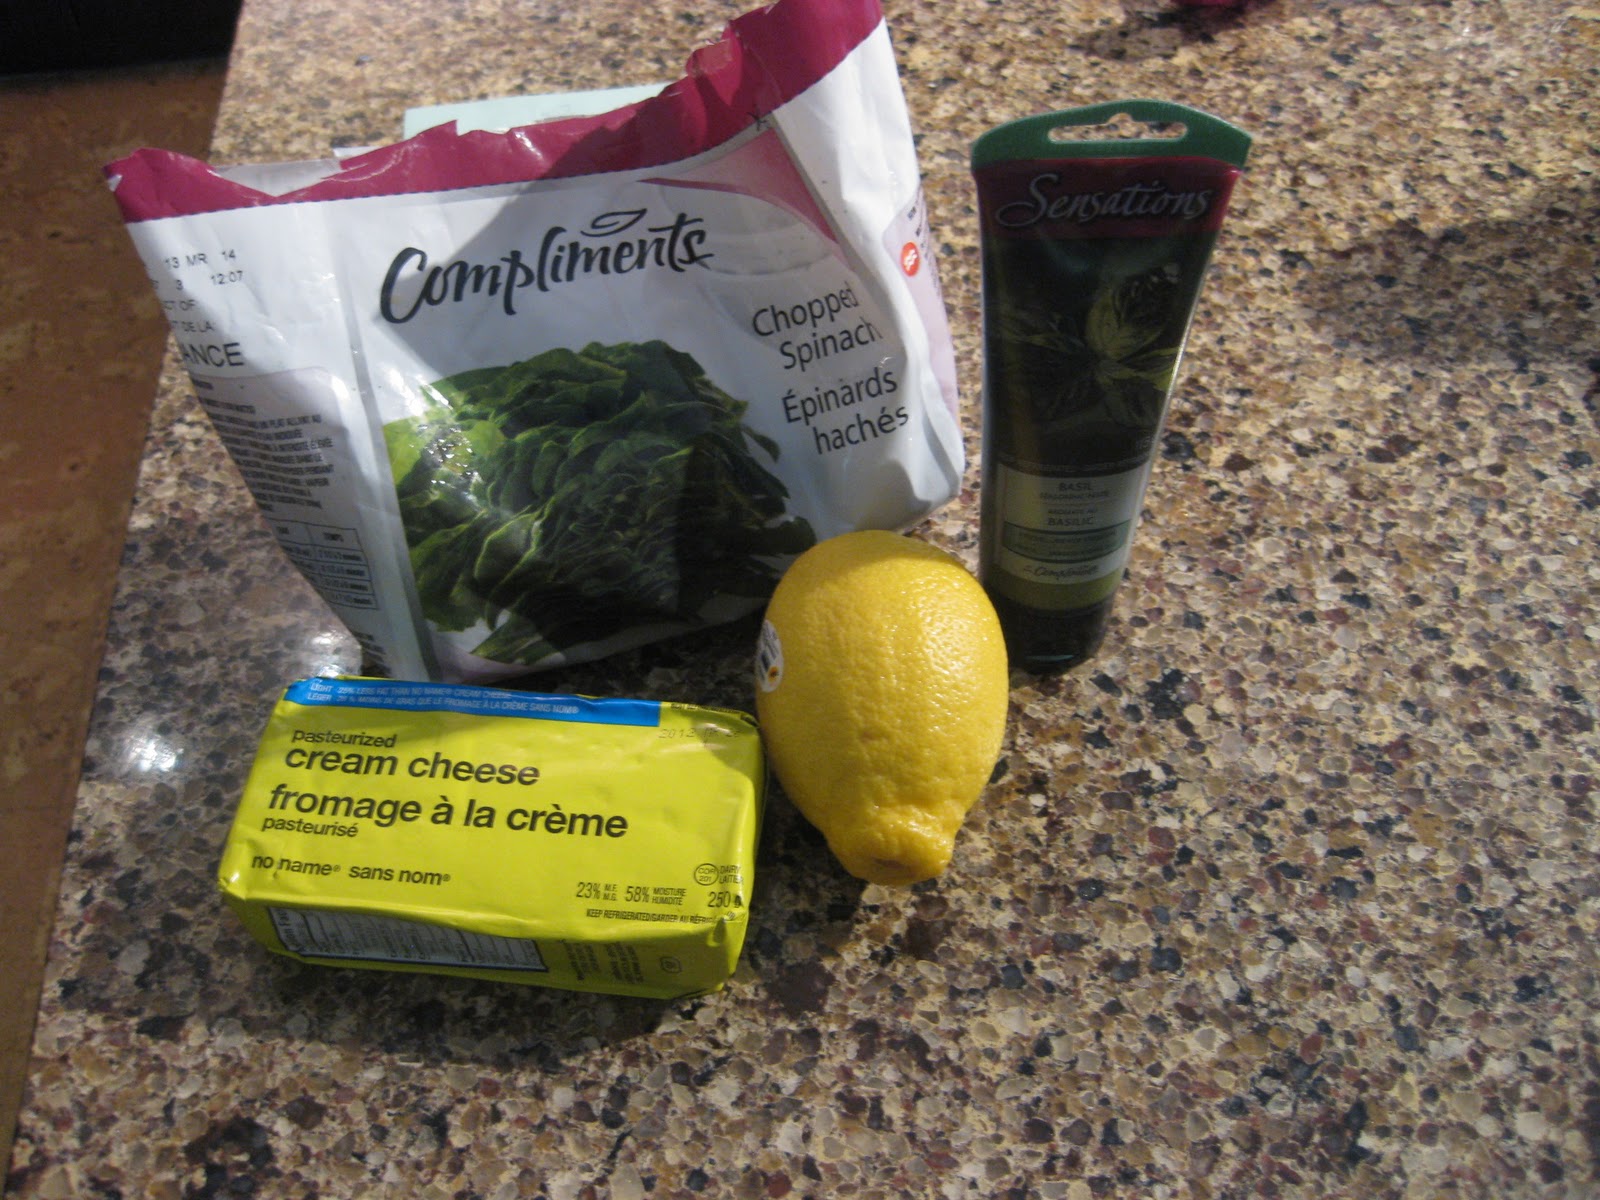
My first filling I made was my take on the traditional spinach "spanikopita" style.

I used:

1/2 pkg of frozen spinach, microwaved for about 90 sec and then the water squeezed out
3/4 pkg of cream cheese
squeeze of basil paste from Sobey's
about a tbsp chopped fresh basil
couple tbsps of freshly grated parmesan cheese
juice and zest of half a lemon (to brighten the flavours)
S & P

(Not all of the ingredients are shown in the picture because I kind of make these up as I go along!)


And this filling turned out like this:


I used the same mixer for all of these - I just emptied the fillings into containers and then rinsed and wiped out the bowl, spatula and beater. It wasn't that annoying, trust me.

The next filling I made actually turned out to be something I'm going to use as a dessert. I wanted to do sort of a sweet and savoury kind of thing and it just turned out like more of a dessert flavour. It's still very good but I might serve it as a dessert instead of an appetizer.

What I used:
Goat cheese (half the pkg pictured)
1/4 pkg cream cheese
2 heaping tsp blackberry jam
zest and juice of half a lemon
S & P


When I make these, I'm going to put a fresh blackberry in each little pastry.


The next one I made was with crab and I think it turned out really well.

I used:
1/2 pkg cream cheese
1 can of crab meat (PC brand - highly recommend)
1-2 tbsp chopped fresh chives (I just use kitchen scissors and cut these into the bowl - very easy)
juice and zest of half a lemon
1-2 tbsp fresh grated parmesan cheese
S & P


The last one is a favourite of my family's and it's the most time consuming so I left it to last.

What I used:
2-3 cups of chopped mushrooms
3 cloves of garlic, crushed
3 finely chopped shallots
tsp dried thyme
S & P
1 tbsp butter

These ingredients I threw in a pan to saute and soften before I combined them with the cream cheese.


3/4 pkg cream cheese
1-2 tbsp parmesan cheese


I'm also going to but a small slice of brie cheese with each of these mushroom ones when I stuff them.

Stay tuned for part 2!

Friday, December 9, 2011

Recipes to come over Xmas

Hey friends,

I apologize if I've been a little absent lately but it's been so busy in my life, I haven't cooked a meal apart from KD and frozen pizzas. Let's face it, those are not blog-worthy meals.

But, the good news is, it's the last day of school and that means Xmas holidays are upon us. I will have oodles of time to cook delicious food I can blog about.

Just a taste of the recipes to come:

shortbread cookies

phyllo pastry appetizers 

stuffed mushrooms

butter tarts

xmas cookies (although it's unlikely mine will look this nice


Friday, November 25, 2011

Chef Michael Smith web videos

TV isn't like it used to be. We have so much to choose from. We channel surf and we skip commercials. As a result, the web video is becoming more and more popular. People are looking to the web more and more now to watch what they want, when they want to watch it and cooking shows are no different.

I recently watched an episode of Chef Michael Smith's new web series called Chef Michael's Kitchen. Perhaps the best part about this web series is you can watch it on your laptop or smart phone right in the kitchen when you're making something. Sure, you can look up the recipe from the episode of Chef at Home you watched last week, but being able to watch it step-by-step, right in the kitchen, is the ideal situation for any at-home cook.

I also like how different the look of the videos are to his show. They're a little more rustic looking and look less "produced". I am drawn to the look of them, although I realize they may not be everyone's cup of tea.

Check it out:

Friday, November 18, 2011

Thai Green Curry chicken

I apologize because I actually have blogged about this meal before. But, it's so good, I think it deserves a second blog (with step-by-step photos this time).

This meal is perfect any day of the week and it's a great way to use up vegetables that you may have just sitting in the fridge. Because it's essential a stir-fry/soup, there are no rules with regards to what you can and can't put in.

*Just a note: green curry doesn't resemble your typical, yellow Indian curry in any way, shape or form. If you are thinking about skipping over this recipe because you don't like curry, just give it a try! Green curry is a really good example of the perfect balance between salty, sweet and spicy. It's nothing like Indian curry and everyone I've ever introduced it to has loved it!

Here's what I used in mine:


3 cans of coconut milk (which made a HUGE batch)
Thai green curry paste (I got mine at an Asian food store but they have it at regular grocery stores. I believe the brand is Thai Kitchen which I actually like more than the one I used)
Chicken breasts and thighs (I like the mix of white and dark meat)
Lime zest
Fresh Basil and/or cilantro
A whole whack of vegetables (I think I used broccoli, mushrooms, green and red pepper)
Minced onion or shallot
Thai Jasmine rice for serving the whole thing over

What to do:
I started by browning the chicken. I did this in two batches because I had a pound of both thighs and breasts. I always do this even though most recipes just tell you to add it in the broth and cook for 20-25 minutes. This is just too long for me and I like to have a little brown on my chicken. If you poach the chicken in broth, you won't get any colour on it at all.

Next, remove the chicken and sauté the shallots in a little bit of oil just until soft.


Once the shallots are soft, you can add the other vegetables. I covered them at this point just to help steam them a little. I like my vegetables pretty crispy so I didn't cook them for long but anywhere from 4-8 minutes should do the trick.

Next, I added the coconut milk, curry paste and lime zest. I ended up using a lot more curry past than I thought I would, probably because I wasn't as big of a fan of the brand I used as I am of the Thai Kitchen brand. I would say for a batch this size though you would need to add about 5 tbsp. Do it gradually though and taste in between so you can get the exact amount of spice you want.

Then, add back in the cooked chicken.

At the last minute, add in the chopped fresh basil. Basil is a delicate herb and if you add it any earlier, it will completely lose its flavour.

Serve over rice and enjoy!

Friday, November 11, 2011

The Best (Traditional) Grilled Cheese

Now, I know I've blogged about grilled cheese before; a fancy grilled cheese inspired by one I had in Minneapolis but I'd like to take this time now to blog about my favourite way to make a traditional grilled cheese.

I'm a huge fan of the grilled cheese sandwich and I can honestly say I can and have had it for breakfast, lunch and dinner. But, I like my grilled cheese with a tiny add-on. Onions. Yes, I said onions. My dad is the one who got me started with this trick and I never have a grilled cheese any other way now. I wonder if I'm the only one who does this... (besides my dad of course) If it sounds weird to you, don't knock it until you try it. Seriously. It's so delicious. The onions soften and "cook" a little in the sandwich and offer a tiny crunch, tang and sweetness. And, I dip my grilled cheese in ketchup of course. (Not everyone does this - weird, I know)

I use Natural Bakery rye bread because it's my favourite (it's better if you buy the larger, longer loaf because then you get larger slices). I also have the old cheddar that's already sliced. I think it's from Costco.

Then, butter both of the outside slices of the bread and throw in a pan. Make sure you're patient and do it over very low heat. Otherwise, you'll burn the bread before the cheese inside melts.

Then, when it looks like this, flip it over! It'll take probably around 4 minutes or so. Honestly, once you've done this enough, you'll know by smell. I know it's time to flip when I start to smell toasty bread.

And when it's golden brown on both sides and the cheese is melty, slice in half and serve with a big blob of ketchup. Yum!

Sunday, November 6, 2011

Slimmed-down Spinach Dip

I'm going to a wedding shower today so naturally I thought it fitting to contribute to the food supply (especially because dips and appetizers are usually my favourite to make). I tried this recipe that I found on Foodnetwork.ca and I think it turned out pretty well! (We sampled it last night because I made two batches). The recipe is from a show I watch occasionally called Eat, Shrink and Be Merry hosted by two sisters named Janet and Greta. I like the concept of the show - they take really fattening recipes and come up with healthier alternatives - but to be honest, I just can't stand the women who host it. They are quite irritating to say the least.

But with all that said, the recipe was good so I'm going to share it with you.

What you'll need:
1 can artichoke hearts (not marinated) - I couldn't find this so I actually bought a jar of marinated artichoke hearts and rinsed them.
1/2 yellow onion, coarsely chopped
3 large cloves of garlic, peeled and cut into thirds
1 tbsp olive oil
salt and pepper
1 can white kidney beans, drained and rinsed
1 cup light sour cream
1 pkg light garden vegetable cream cheese
1/2 tsp grated lemon zest
4-5 dashes hot pepper sauce
1/2 pkg frozen spinach, thawed, squeezed dry and chopped
1 cup shredded asiago cheese


1. Preheat oven to 425 degrees.
2. Drain artichokes and pat dry. Roughly chop artichokes and toss them with the onions and garlic. Drizzle with olive oil and sprinkle with salt and pepper. Mix well and roast uncovered for about 30 min (give them another toss when they're halfway through).

(I made two batches, that's why it's divided like that)

3. While vegetables are roasting, place kidney beans, sour cream, cream cheese, lemon zest, and hot pepper sauce in the food processor. Whirl until smooth.


4. Remove artichoke mixture from oven. Reduce oven temperature to 375. Let vegetables cool for a few minutes, then add them to the food processor. Pulse on and off until the mixture is well blended but still chunky.


5. Transfer to a bowl and stir in spinach and all but about 2 tbsp of the cheese.


6. Spoon the mixture into a casserole dish and top with the remaining cheese.


7. Bake, uncovered for about 30 minutes until it bubbles and the cheese gets a little bit of colour. Then, serve with pita chips or crackers!


This isn't part of the recipe but I thought I'd give you a tip on the spinach.

I microwaved mine for just under two minutes in a casserole dish. This is what it looked like:

Once it's thawed, I took it in handfuls and squeezed it over the sink to get the water out. It's unbelievable how much water you can squeeze out of cooked spinach. I then transferred it to about 12 paper towels layered on top of one another and squeezed out oven more liquid until what you have looks like a green hockey puck.


Thursday, October 27, 2011

Baby it's Cold Outside, Give me Curry

When the weather turns cold, I crave something warm in my belly. Soup, chilli, and mac n' cheese are often on the menu at my house. Winter's coming so it's time to start stocking up on those foods to warm you up from the inside out.

Another warming food I really enjoy is a curry. I love curry - all colours - but yesterday I was craving a yellow Indian curry so that's what I decided to make! I took some photos throughout so I hope that helps you with the recipe.

What you will need:
3 chicken breasts cut into bite-sized peices
any vegetables you have also cut into uniform pieces (I used snap peas, baby carrots, onions and celery but feel free to use anything you have in the fridge)
2 cloves of garlic, minced
3 tbsp curry powder
1 tsp ground cinnamon
1 tsp paprika
1/2 tsp fresh ginger (A really good trick for this is to keep it in the freezer so you have some on hand all the time for grating - buy a piece, give it a bit of a peel and then stick it in the freezer. You can then take it out and grate whatever you need when you have a recipe that calls for fresh ginger)
1 bay leaf (I used it, that's why it's in the picture but I don't think you really need it in a dish that has such a strong flavour. I think it gets lost.)
1/2 tsp white sugar
1 tbsp tomato paste
1 can coconut milk
1 cup plain yogurt


What to do:
Start by browning the chicken and then set aside.


Next, soften the onions in a pan. Add the garlic and the vegetables to get them a little soft (I like my vegetables really crispy so I don't leave them for very long.

Then, add the spice mixture (cinnamon, curry, ginger, sugar, paprika, s & p) along with the tomato paste and coconut milk.


Heat this for a few minutes just to give the vegetables a bit more time to soften.
Then, add the chicken back into the mixture.

And the yogurt.


Now, all you have to do is mix everything up and let it heat through until it's bubbling. And, serve over rice. I like jasmine rice but you can use anything you'd like.

Friday, October 21, 2011

Garbage Pasta (don't worry, not really)

Don't panic - by garbage I just mean whatever you have leftover in the fridge.

Last night wasn't the first night I took some leftovers and made a delicious meal. How often do you open your fridge and feel like you have nothing when really the crisper is over flowing? Probably more than you'd think.

This meal can't really have a recipe because you'll make it with whatever you happen to have in the fridge. I will give you the recipe for the sauce I made though because it was delicious (and healthy too).

What you will need for the garbage pasta

- 1 pkg of any pasta of your choice
- any vegetables you may have in the fridge (I used cherry tomatoes, broccoli and cauliflower). Some other suggestions: spinach, mushrooms, green or red peppers (or yellow or orange - why not?), baby carrots, bok choy (seems random but who knows?). Really, you can use any vegetable of your choice.
- any leftover meat you have (chicken, shrimp, steaks) I used some chicken sausages I had in the freezer.

All you have to do to make the pasta (make sure you salt the water), and throw all your other ingredients in a large saute pan to soften the vegetables.

For the sauce:
1/4 cup of flour
2 cups of chicken broth
1/2 cup of Greek yogurt
1 tsp of garlic powder
1 tbsp of pesto
1/4 cup of parmesan cheese

What to do:
This is an easy way to make a healthier version of a roux (butter and flour mixed together and used to thicken sauce).  All I did was take about 1/2 cup of the broth put it together with the flour in an air tight container. I gave it a good shake and then mixed it with the remainder of the broth.

Heat the broth mixture and add the garlic powder. Once it comes to a boil, add the Greek yogurt, parmesan cheese and pesto.

Then, just toss the sauce, pasta and meat and vegetables together and voila! You've got a garbage pasta!

Here's what mine looked like:

Sunday, October 16, 2011

My favourite dip - the green stuff

This post has been a long time coming and I can't believe I've never written about guacamole before!

There are so many different ways to make this delicious green dip and to be honest with you, most of the time, I make it the easy, fast way - with a packaged mix. I know, I know, how can I call myself a foodie if I use this pre-made guacamole mix but it's really good and it also has an ingredient in it that I find even better than citrus for keeping the guac from turning brown.
This isn't the exact one I buy but I think they're all pretty similar. They're also usually placed right by the avocados in the grocery store.

If however, you are feeling ambitious, you can do it this way (this is my favourite way to make it if I have the time/energy/ingredients):

2 avocados
2 tbsp chopped red onion
1 finely chopped jalapeno pepper
handful of chopped cilantro
juice from 1/2 lime.
lots of s & p

Then, you just mash the avocados and mix in the other ingredients. Serve with tortilla chips.

I also have one of these things which is awesome for scooping the avocado out of the skin.
Or, if you're in the grocery store and craving guacamole but don't feel like making it, they have this at Safeway and apparently at Costco too. I haven't tried it but I'm told it's really good and tastes like the real thing. I've never been a fan of pre-made, store-bought guacamole because it just doesn't taste anything like real avocados - I don't think they're meant to be preserved (they turn brown when they're exposed to the air). 


Friday, October 7, 2011

Jamie Oliver and my dad

Hey readers,

I'd like to blog about my dad today. That's right, my dad, like me, does enjoy to get his hands dirty in the kitchen once in awhile. (Although my dad is like the cleanest person ever so he doesn't really get dirty. That was just a figure of speech.)

Our PVR is full of recordings of Jamie's Meals in Minutes because my dad just loves it! I think it's Jamie's style and approach to cooking that make him so desirable as a TV personality and chef. He's very "no muss, no fuss" and his style is very rustic. I would recommend checking out his show on the Food Network if you get the chance.

The other day, my dad decided he was going to take over making dinner so he went shopping and planned an entire meal (on a weekday). He made pork tenderloin rubbed with rosemary and garlic, smashed carrots, peas and a delicious garlic bread.

Here's a clip from the show:

Friday, September 30, 2011

Another PR fail - Foodie Edition

You guys all know that I'm a PR nerd so when I saw this food-related PR "fail", I knew I had to share it with you.


It was August in New York and a bunch of food bloggers were invited to dine at an underground, swanky, hip restaurant in the West Village. They were told they would be enjoying food prepared by George Duran, the chef who hosts "Ultimate Cake Off" on TLC.


The event was organized by PR and Marketing agency, Ketchum whose client was ConAgra Foods.


The bloggers were invited to:


“an intimate Italian restaurant” where attendees would enjoy a “delicious four-course meal,” Mr. Duran’s “one-of-a-kind sangria,” and learn about food trends from a food industry analyst, Phil Lempert. The invitation continued that upon confirming — for one of five evenings beginning Aug. 23 — bloggers would receive an extra pair of tickets as a prize for readers and that the dinner would include “an unexpected surprise.” (NY Times)


Sounds like a great event, right?


Wrong!


After the bloggers were finished eating, it was revealed to them that they had actually eaten a Three Meat and Four Cheese Lasagna by Marie Callender’s, a frozen line from ConAgra Foods.


Needless to say, the bloggers were offended. ConAgra invited influential bloggers who write about and review good quality, real food. They were quite cheesed when they found out what they had unwillingly eaten and they even served the lasagna to a blogger who was open about the fact that he's allergic to preservatives and one who writes about being calorie conscious.


Here's what ConAgra had to say (from NY times):


“The twist at the end was not dissimilar with what brands like Pizza Hut and Domino’s have done in the recent past with success,” she said, referring to hidden-camera advertising campaigns. ConAgra expected to use the footage for promotional videos on YouTube and its Web site, and for bloggers to generate buzz when they wrote about being pleasantly surprised.


I understand what ConAgra was trying to do but even I know they did it with the wrong audience. Prominent food bloggers are not interested in frozen microwaveable meals. They were trying to copy a campaign used on regular, busy families with the same effect. No such luck, ConAgra.


Some of the responses:
Here's a sampling from the FoodMayhem blog:
To Mr. George Duran:

On behalf of the the culinary world, we hereby revoke your dodin bouffant; apron; and most of all, your right to call yourself a ‘chef’.  You sir are an embarrassment to those in the culinary industry working hard to maintain and enhance a culture of food as one of the best parts of living.
We discussed with the group the sad state of chemical-filled foods and discussed various chains.  And yet, you still fed me the exact thing I said I did not want to eat.


And this from the ChubbyChineseGirl blog:
I'm NOT their target consumer and they were totally off by thinking I would buy or promote their highly processed frozen foods after tricking me to taste it.

Friday, September 23, 2011

Best things about Autumn - Food Edition

Hey guys,

I haven't done a lot of cooking in the last week (other than the regular stuff) so I apologize for the lack of recipe in this post but I would like to talk the time to talk a little about autumn related food.

That's right, it's time to say goodbye to lovely summer salads and sangria and trade it in for more heartier, warming meals. And the best part of fall? Fall suppers! That's right, those suppers that are put on by all the ladies of a church and are usually held in a church basement. Those suppers where you buy one ticket and all the food is there for you to enjoy (as much as you want!). Not so good when you've recently joined Weight Watchers though.


The fall harvest is perhaps one of the best things about fall as well. My mom, Nana and I went to a Hutterite colony and got a ton of fresh vegetables, baking and preserves. We bought some jams, meat pies and some fruit pies. They also had lots of different pickled things and even a ready-to-eat jarred vegetable soup.

Also, if you are a Red River College student like me, don't forget to check out the next issue - my very first installment of my brand new food column!

Thursday, September 15, 2011

Yet Another Delicious, Lean Recipe

If you're anything like me (maybe you aren't but hear me out anyway), you are constantly trying to watch your calorie intake. I recently joined Weight Watchers and last night I made this fantastic recipe that was only 6 points! For those of you who don't know, that's pretty low for an entire meal.

I got the idea to make this dish from an Eating Light magazine but of course like every recipe, I made my own changes and adjustments to it.

Spaghetti Squash and Turkey Meatballs:

You will need:
1 spaghetti squash (this should be enough for about 4 people depending on the size of the squash)
1 jar of your favourite spaghetti sauce
1 lb of lean ground turkey
1/4 cup of italian style breadcrumbs
1/4 cup of parmesan cheese
1 tbsp of fennel seeds
1 tbsp of chopped, fresh basil
3 cloves of garlic, minced
1 egg white
1 tbsp olive oil
s & p

What to do:

1. Cut the spaghetti squash in half lengthwise, remove the seeds and stick in the microwave for about 5-8 minutes. You will know it's ready when you can easily scoop out the "spaghetti" strands. Fully scoop out the squash and set aside.

For the meatballs:
2. Mix the turkey, garlic, egg white, breadcrumbs, parmesan cheese, fennel, olive oil, basil and some salt and pepper by hand. Form small meatballs (about the size of a ping pong ball) and place on a baking sheet lined with tin foil.
3. Cook the meatballs under the broiler for about 6 minutes on each side. I can never tell when they're done unless I take a small peek inside one of them so feel free to do this. No one will judge you.
4. Heat the spaghetti sauce in the microwave or in a pot on the stove. When the meatballs are done, mix them with the sauce and serve over the spaghetti squash.
5. Top with a little more s & p (if needed), a little parm and maybe some of the fresh basil to make the plate look pretty!

Wednesday, September 7, 2011

Food Network Canada App

In keeping with the theme of my blog AND fulfilling a class requirement, I'd like to share with you the wonderfulness that is the Food Network Canada app.

As you can imagine, I've tried a lot of apps related to food and cooking. When I'm making meals, I don't necessarily follow recipes but I definitely take inspiration from all sorts of recipes from a bunch of different places.

I chose to blog about the Food Network Canada app because the Food Network is of course a TV channel and therefore, a business. The app uses the following principles of persuasion to get you to watch the channel.

Identification - I can use these recipes to make delicious dishes for my family, just like my favourite Food Network stars.
Action - All the recipes from my favourite Food Network stars are at my fingertips. I don't have to go to a website to see them.
Familiarity and Trust - The recipes featured are ones I've seen before on TV on a channel I like from a "company" who knows how to cook.
Clarity - the app is easily read with clear directions and nice pictures.

The reason why I love this app is because there's a vast index of recipes and I love to see the pictures (I'm very inspired by pictures). And let's face it, the Food Network is on my mind when I'm cooking. For someone who isn't an avid viewer of the Food Network (because I am already), the app is a constant reminder of what they could be learning how to make by watching the network.

Wednesday, August 31, 2011

Exchange District eats!

Hello everyone,

So we're back at school now and you know that means back to blogging religiously. So you can all look forward to some wonderful school-time (or anytime) recipes from me.

But today, I'd like to pay homage to a wonderful little spot on Albert that I can't believe I've never been to! It's called Ken Hong. I can't provide a proper review because everyone at my table had the won ton soup (which is good for an entire lunch and it's only $4.99). It's made with a rich beef broth (I think) and it's loaded with won tons, green onions and crunchy noodles.

The restaurant is fairly small with only about 10 tables and there didn't seem to be air conditioned. They are only open until 3p.m. so unfortunately, lunchtime is really your only option.

The prices were perfect (especially if you're a student). Exchange District restaurants are usually so expensive so it will definitely save me some money this year knowing I can get lunch for under five bucks.

Here's a photo of the soup that my friend Lorilynn took: